


This time we are going to use the free react router dom to be able to create protected routes in our React JS application.
Any kind of feedback is welcome, thanks and I hope you enjoy the article.🤗
⚠️ Note: You need to have some knowledge of React Router Dom.
Table of Contents.
📌 Technologies to be used.
📌 Creating the project.
📌 First steps.
📌 Creating the pages.
📌 Integrating React Router.
📌 Adding routing protection.
📌 Conclusion.
🔒 Technologies to be used.
- ▶️ React JS (v 18)
- ▶️ Vite JS
- ▶️ TypeScript
- ▶️ React Router Dom (v 6)
- ▶️ CSS vanilla (The styles can be found in the repository at the end of this post)
🔒 Creating the project.
We will name the project: protected-routes (optional, you can name it whatever you like).
npm init vite@latest
We create the project with Vite JS and select React with TypeScript.
Then we run the following command to navigate to the directory just created.
cd protected-routes
Then we install the dependencies.
npm install
Then we open the project in a code editor (in my case VS code).
code .
🔒 First steps.
We go to the src/App.tsx file and delete all the content to create a new component. That for the moment only render a hello world.
const App = () => {
  return (
    <>
        <div>Hello world</div>
    </>
  )
}
export default App
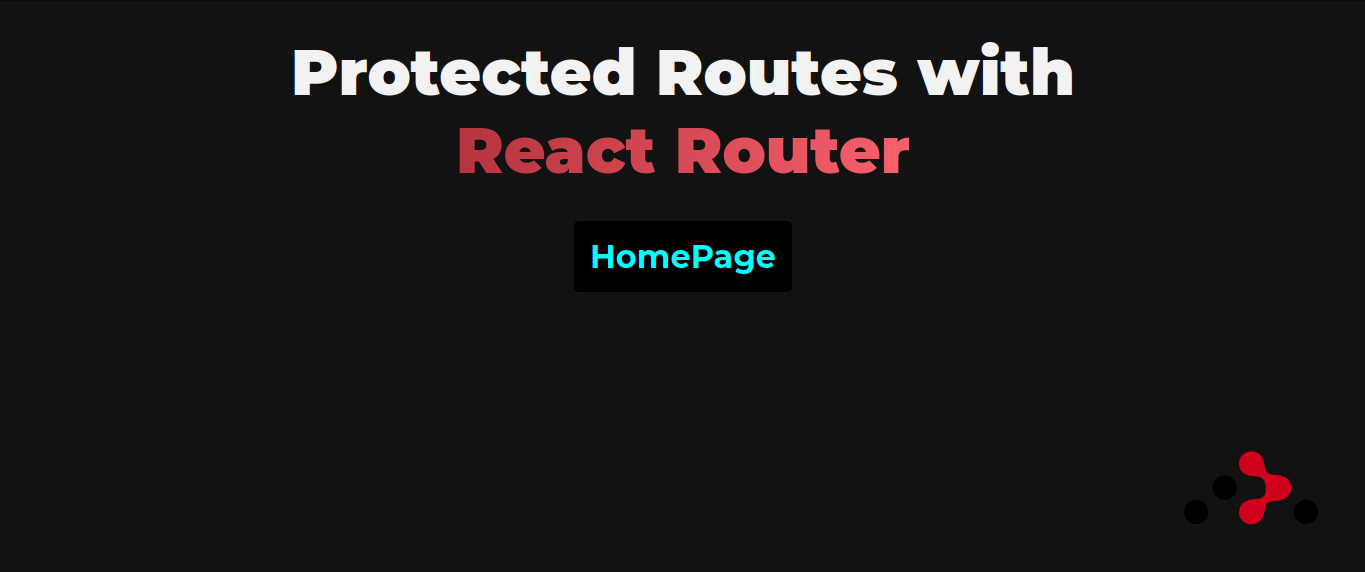
The next step is to create a Layout, this is only for aesthetic purposes for the app, it is not mandatory.
🚨 Note: Every time we create a new folder, we will also create an index.ts file to group and export all the functions and components from other files that are inside the same folder, so that these functions can be imported through a single reference. This is known as barrel file.
We create the folder src/components and inside we create the file Layout.tsx to add:
interface Props { children: JSX.Element | JSX.Element[] }
export const Layout = ({ children }: Props) => {
    return (
        <div>
            <h1>Protected Routes with <br /> <span>React Router</span></h1>
            {children}
            <div className="logo">
                <img src="https://cdn.svgporn.com/logos/react-router.svg" alt="react-router" />
            </div>
        </div>
    )
}
Then we import it in the file src/App.tsx.
import { Layout } from "./components"
import { AppRouter } from "./routes"

const App = () => {
  return (
    <Layout>

    </Layout>
  )
}
export default App
It should look like this 👀
🔒 Creating the pages.
We create the folder src/pages and inside we create two files:
- HomePage.tsx, which will act as the page that we want to be private, that is to say that only users with some authentication can visualize that page, even if the user knows the URL of the page, he/she should not be able to see it.
export const HomePage = () => {
    return (
        <div className="page">HomePage</div>
    )
}
- LoginPage.txs, which will act as the public page that anyone without authentication can see, but if the user already has an authentication then this page should not be visible even knowing the URL.
export const LoginPage = () => {
    return (
        <div className="page">LoginPage</div>
    )
}
We are not yet importing these two pages anywhere.
It is worth mentioning that no authentication method or anything similar will be performed.
🔒 Integrating React Router.
First we have to install react router dom:
npm install react-router-dom
Then we create a folder src/routes and create the file AppRouter.tsx.
This file will be the root of our router, from here the other routes will be triggered.
We create a functional component.
export const AppRouter = () => {
    return ()
}
We have to import some components that react-router-dom offers us.
BrowserRouter, this component has to wrap our whole application since it is a provider. One option is also to put it in the
src/main.tsxfile, but in my case I would like to put it in this AppRouter.tsx file and as this is the root of the routes then this is what we are going to import insrc/App.tsx.Routes, this component must be inside the BrowserRouter, and it is the container of the routes that our application handles, and every time the location changes, this component searches through all its child routes, to find a route that matches the location and to be able to render the element that exposes that child route.
Route, this component is where the route will be defined (using the path prop) and the element to render (using the element prop passing a JSX element).
- When we place a '*' in the prop path, it means that in case no previous path conicity with the location, then we can render a 404 page, but in this case, the user is sent to another location.
Navigate, this component is used to change the current location when rendering.
- to, is the prop to place the path to where you want to go in your application.
- replace is the prop to remove from the navigation history the current path, and place the new path you are going to. That is to say that when you want to go back, the previous page will no longer be there.
import { BrowserRouter, Routes, Route, Navigate } from "react-router-dom"

export const AppRouter = () => {
    return (
        <BrowserRouter>
            <Routes>
                <Route path='/' element={<HomePage />} />
                <Route path='login' element={<LoginPage />} />

                <Route path='*' element={<Navigate to='/login' replace />} />
            </Routes>
        </BrowserRouter>
    )
}
Done, here we have And now we need to make changes to the AppRouter.tsxfor the moment our root router.
Now let's place it in src/App.tsx.
import { Layout } from "./components"
import { AppRouter } from "./routes"

const App = () => {
  return (
    <Layout>
      <AppRouter />
    </Layout>
  )
}
export default App
You will notice that it will render the HomePage.tsx, this is because when we enter our app, by default the path / and matches the path that renders the HomePage.tsx.
And if in the address bar you put /login, then it shows you the LoginPage.tsx.
But if you put anything other than a simple / or /login, then it defaults to and renders the Navigate component that sends you to */login.
🔒 Adding routing protection.
By default, you can display the HomePage.tsx but it should not be possible, since you do not have an "authentication". So let's convert this route into a private route.
Let's create a new file in src/routes named PrivateRoutes.tsx.
And inside we are going to create a new set of routes, which will be our private routes.
To nest routes we need both the routes container which is the Routes component and the routes as such which are the Route component.
Here will go all the routes that we want to be private. We only move the route that renders the HomePage to this component.
And we will also add a new route to send to the user in case the user enters a route that does not exist in our app.
With the wildcard '*' in the prop that we mentioned before, we make reference to the fact that if the location does not coincide with some route, then we send the user to the / or to the HomePage.
import { Navigate, Route, Routes } from 'react-router-dom';
import { HomePage } from '../pages';

export const PrivateRoutes = () => {
    return (
        <Routes>
            <Route path='/' element={<HomePage />} />
            <Route path='*' element={<Navigate to='/' replace />} />
        </Routes>
    );
};
And now we need to make changes in the AppRouter.tsx.
We are going to simulate authentication with a simple variable (although in a real app it will most likely come from an API), the important thing is that you have access to some value that tells you if the user is authenticated or not and you can use that value in the AppRouter.tsx:
type Status = 'checking' | 'authenticated' | 'no-authenticated'

let status: Status = 'no-authenticated'
In the case of the checking option is when the app starts and you don't know if the user is authenticated or not. In that case you can render a loading.
if (status === 'checking') return <div className="loading">Checking credentials...</div>

And now we will make a condition inside the Routes container, where if the user is authenticated then let him see the private routes and don't show the login which at this point will be unnecessary since the user is already authenticated.
Otherwise, don't render the private routes component and show the LoginPage.
And at the end, after the condition, we still keep the path with the wildcard [*] because if the user enters a path that does not exist then, we must send it to some part of our app that does exist.
Note that in the path where we use [] the path of the prop to is /login and is not simply login. Because if we put just the word *login then it will keep the URL as is and just add /login, which we don't want.
For example, if we are in localhost:5173/about and we want to send the user to login, and in the Navigate component in the prop to we only put login without the / at the beginning then the resulting URL would be localhost:5173/about/login but we want to point to the root of our routes and that is why we must put the symbol / at the beginning, so that it sends you to the URL localhost:5173/login.
import { BrowserRouter, Routes, Route, Navigate } from "react-router-dom"
import { PrivateRoutes } from "./"
import { LoginPage } from '../pages';

type Status = 'checking' | 'authenticated' | 'no-authenticated'

let status: Status = 'no-authenticated'

export const AppRouter = () => {

    if (status === 'checking') return <div className="loading">Checking credentials...</div>

    return (
        <BrowserRouter>
            <Routes>
                {
                    status === 'authenticated'
                        ? <Route path="/*" element={<PrivateRoutes />} />
                        : <Route path="login" element={<LoginPage />} />
                }

                <Route path='*' element={<Navigate to='/login' replace />} />
            </Routes>
        </BrowserRouter>
    )
}
Also note that the path of the private routes is '/*' meaning that any route that matches the / then enters the PrivateRoutes component.
An example would be: you have the path about/ and someone puts the in browser about/me then that would be allowed and would access the element that renders that path. If you remove the wildcard [] then the about/me path would NOT be allowed.
So far we would already have our private routes, and a single "public" route but what if we have more public routes like the one to create user, then we must create a new component called PublicRoutes.tsx.
And add the routes that we want to be "public" or available when the user is not authenticated.
import { Navigate, Route, Routes } from 'react-router-dom';
import { LoginPage } from '../pages';

export const PublicRoutes = () => {
    return (
        <Routes>
            <Route path='login' element={<LoginPage />} />
            <Route path='*' element={<Navigate to='/login' replace />} />
        </Routes>
    );
};
And this is how our AppRouter.tsx would look like.
import { BrowserRouter, Routes, Route, Navigate } from "react-router-dom"
import { PrivateRoutes, PublicRoutes } from "./"

type Status = 'checking' | 'authenticated' | 'no-authenticated'

let status: Status = 'authenticated'

export const AppRouter = () => {

    if (status === 'checking') return <div className="loading">Checking credentials...</div>

    return (
        <BrowserRouter>
            <Routes>
                {
                    status === 'authenticated'
                        ? <Route path="/*" element={<PrivateRoutes />} />
                        : <Route path="/*" element={<PublicRoutes />} />
                }

                <Route path='*' element={<Navigate to='/login' replace />} />

            </Routes>
        </BrowserRouter>
    )
}
You will notice that both routes have the same path, but it will not be a problem since their existence is conditional, or only one route will always exist.
By the way, if you need some route to be accessed with or without authentication then place it in the AppRouter.tsx after the condition.
And so we would have both public and private routes. 🥳
🔒 Conclusion.
Private routes are very relevant nowadays in applications. And with the help of React Router Dom makes it much easier to implement this process.
Another idea that I can give you is that in the private routes you can nest other routes to divide them by role for example, if a user has the role of 'user' he will not be able to see the Admin page, but if he has the role of 'admin' then he will be able to see that page.
I hope you liked this post and that it helped you understand more about how to use React Router Dom to implement route protection. 🤗
This way of making private routes, is not the only one, if you know any other different or better way to perform this functionality you can comment it 🙌.
I invite you to check my portfolio in case you are interested in contacting me for a project!. Franklin Martinez Lucas
🔵 Don't forget to follow me also on twitter: @Frankomtz361